Baking gluten free bread can be overwhelming, frustrating, and scary. But it doesn’t have to be. Learn to bake good gluten free bread the first time and every time, by taking class, a virtual cooking class from Gluten Free Cooking School.  An updated version of this recipe is featured in the class.
Now that I’ve given you my new all-purpose gluten free, soy free flour mix, you need a recipe to try it in. Based on the questions and comments I’ve received I decided to start with bread. Everyone who goes gluten free starts to miss bread pretty quickly, and a nice loaf of gluten free bread can go a long way to making you feel better about your new diet.
For more great gluten free recipes like this one, check out my ebook, The Gluten Free Survival Guide. I’ve packed it full of all of my favorite GF recipes, including bread, biscuits, waffles, scones and more. I know you’ll enjoy cooking them as much as I do!
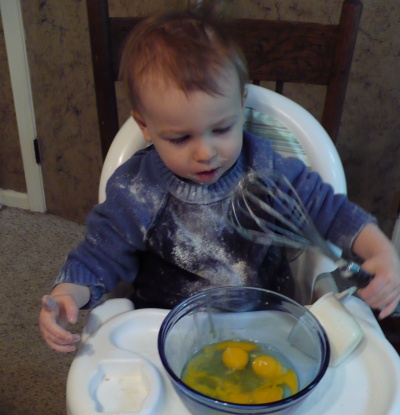
I found a new sous chef for this experimental baking. Please let me introduce Sous Chef David.

Experiments in Bread Baking:
For the baking session, I decided to make enough dough for two loaves and cook one in the bread machine and one in the oven. I recently posted “conventional oven” directions (in the comments) for my original Gluten Free Sandwich Bread post and I wanted to make sure that they were correct. And I thought it would be fun to compare the two loaves. You know me; I like experiments.
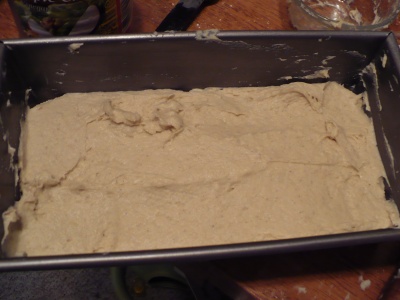
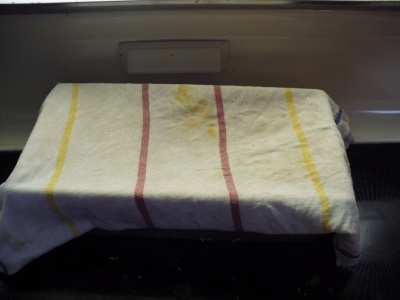
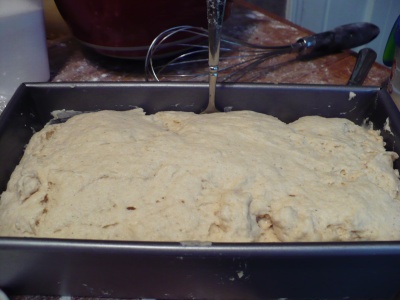
David and I made a double batch of the dough (see recipe below) and then scooped half of it into the bread machine. I’ve lost the paddle to my machine, so I just threw the dough in without it and set the bread to bake on the 80 minute “Express Bake” setting.The other half of the dough was scraped into a greased 10″ Calphalon loaf pan. The dough needed to rise in a warm place for 45 – 60 minutes and the only warm place that I could find was on the stovetop in front of the vent from the oven. I wasn’t sure if this would counteract the somewhat chilly temperatures of our house, but the bread was pushing at the top of the cloth within 45 minutes. After the bread rose I baked the loaf in a 375 degree oven for 60 minutes.
And here are the results:
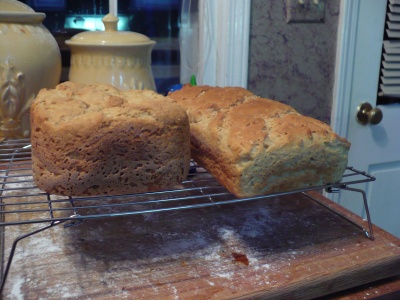
The bread machine bread is on the left and the oven bread is on the right. These loaves turned out pretty much as expected. My oven loaves have always been on the short side, but I think this is primarily because my loaf pan is longer and wider than my bread machine pan. There’s just more room to spread. To confirm this theory I cut the end off of each, and you can see in the pictures below that both loaves have the same density.
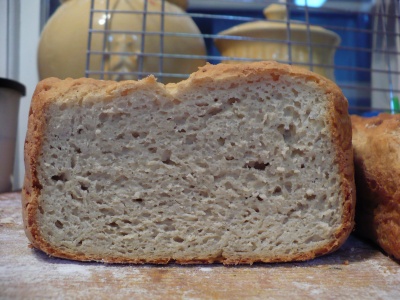
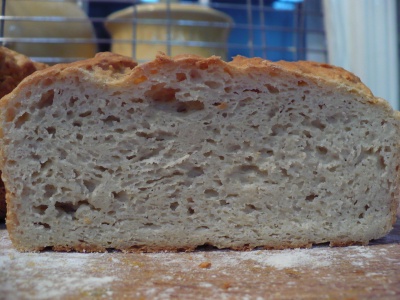
Again, due to some recent reader comments I drug out my measuring tape to determine the exact height to which my loaves had risen. The bread machine loaf topped out a little shy of 3″, while the oven loaf came in right at 2″.
The 3″ loaf is typical for our bread machine. I’ve made higher loaves with store-bought mixes but they always collapsed as they cooled. Even though this loaf is only 3″, it’s always 3″ and I can count on having slices of bread that will hold together for a sandwich. In fact, this is the bread that we use for sandwiches, and along with soup or a salad it is the perfect amount for a meal.
The 2″ loaf of bread is a bit small, but we’ll be eating sandwiches from it too. We may just eat two!
Final Thoughts:
While I am definitely in love with my bread machine, I think that you can bake a good gluten free loaf in the oven if you have the right pan. My bread machine pan measures 7.5″ x 5″ x 5″. I did some quick research on Amazon and a my 10″ loaf pan is technically a 1 1/2 pound pan. A 1 Pound Loaf Pan measures 8.5″ x 4.5″ and, if my theory is correct, should result in a higher loaf.
If you have any insights from your bread-baking experiments that you’d like to share with everyone, please tell me about them in the comments.
Yummy Sandwich Bread Recipe
1 Tbsp. active dry yeast
1 Tbsp. sugar
1 ½ c. water (105 degrees or a little less than hot)
2 ½ cups All Purpose Flour Mix Recipe
2 tsp. xanthan gum
1 tsp. salt
2 eggs
1 ½ Tbsp. oil
1 tsp. cider vinegar
Directions
- First combined the yeast and sugar in a small bowl, Add the water while gently whisking the yeast and sugar. Let this mixture sit while you mix the rest of the ingredients. If your yeast is good then bubbles and foam should form on the top. (By the way, this step is what is commonly referred to as “proofing the yeast”)
- Combine the flour mix, xanthan gum and salt in a large mixing bowl and stir well. If you have a sifter, then by all means sift the flour. I don’t, so I whisk and stir it really well.
- In a third bowl, whisk the eggs, oil and vinegar until the eggs are a bit frothy.
- By this point the yeast mixture should be foamy, so you can pour the two liquid mixtures into the flour mixture. Stir until all ingredients are well mixed and then: (A) dump the dough into your bread machine and bake on the 80 minute setting. (B) Or, following the remaining instructions for a convention oven.
- Grease a loaf pan with shortening, butter, or the appropriately allergen-free substance. Scoop the dough into the pan and smooth it out with a rubber spatula or the back of a spoon. Cover the pan with a damp dishrag and place in warm area so that the dough can rise for the next 45 – 60 minutes. The dough should double in size or reach the top of the pan.
- After the dough has risen, bake in in a 375 degree oven for 60 minutes. When the bread is done it will have a crisp brown crust and it will pull away from the sides of the pan. Remove the pan from the oven, and the bread from the pan, and cool for 15 minutes before slicing.


why do americans use sugar in breads?? and everything else for that matter????
@Denise – because the sugar helps the yeast grow and because we’re incredibly addicted to it =)
“Hello, Has anyone had any success with a bread recipe that is gluten free, dairy free and yeast free. … Thanks for any help! Billie Jo”
Have you tried Pamela’s Baking & Pancake Mix? (pamelasproducts.com) It is not yeast bread of course, but Praise God, it is BREAD! If that is all the allergies you have, there are lots of recipes you can use with this mix. (Use dairy substitutes)
Also, I believe this one came from Mary Francis. I put it in the freezer and take out a piece as desired. It is different, but Praise God, it is BREAD!
I am acquiring a taste for it.
Multi-Grain Flat Bread
(Gluten Free, Soy Free, Yeast Free, Dairy Free, Egg Free)
1/2 c. brown rice flour
1/2 c. teff flour
1/2 c. garfava flour (try sorghum flour)
1 Tbsp. sugar
1 tsp. xanthan gum (try Potato Starch)
1/2 tsp. salt
1/2 tsp. baking powder
1/4 tsp. baking soda
1 c. water
5 Tbsp. ground flax seed
1 Tbsp. canola oil
1 tsp. cider vinegar
Instructions:
1. Mix all dry ingredients together in a medium sized mixing bowl.
2. Add the wet ingredients (water, oil, flax seed) to the dry ingredients and stir until well combined.
3. Divide the dough into two parts and place each one in the middle of an 8″ x 8″ square cake pan that has been lightly greased and floured.
4. Wet the back of a large spoon and use that to spread the dough evenly across the pan.
5. Bake the bread at 350 degrees F for 15 minutes.
6. Allow the bread to cool for a few minutes and then slice each pan into fourths to serve.
(I cut in smaller pieces and it lasts longer! My pan was 7X11.)
i tried this with Arrowhead Mills All Purpose Baking Mix tonight. It is sooo good!
@Christa: I made it with Bob’s Red Mill all purpose flour this weekend and added a 3rd egg and it turned out wonderfully. I was away from home so I let the dough rise to the top of the loaf pan and then baked at 375.
Hi Sally,
It sounds like your bread recipe could really help our family, if you can email it to us we’d appreciate it (or Mary if you can send Sally’s contact info that would be great). My email is norby93@hotmail.com– please write something about this being gluten/soy/yeast free bread so i know that it is not a bogus email.
Thank you for such a great site, it has been very valuable in helping us through this transition of allergy free eating.
Stephanie
@Sally, please send me the recipe too. I have a baby that is sensitive to dairy, casein, gluten, soy, eggs, nuts, garlic, and pretty much most fruits. It is so hard. I am nursing so I cannot eat any of these things either. 🙁
Has anyone received the gluten/soy/yeast free bread recipe from Sally? I posted my e-mail address here as well as sending two e-mails to the address Mary Frances sent to me.
thank you so much for this site..I made the flour torillas and I love them.. 🙂 I am new to cooking gluten free for my daughter and myself! I am just super happy about the tortilla recipie! I put GF refried beans on them and Taco Bell Sauce and froze them so that we will have an easy lunch to take with us..
Thank you!!!!!!!
Dear Mary Frances,
I have been baking of bread etc. for over 65 years, now just trying Gluten Free breads, did enjoy the Yummy Sandwich Bread, but isn’t 1 Tbsp. active dry yeast a lot for 1 loaf of bread. I usually make 4 loaves of bread at a time, I do use regular bread pans, and bake in the oven, as my oven holds 4 loaves of bread the amount of electricity spent is the same on 1 loaf as 4 loaves, but the rise in the dough is so great, have more air holes than I think there should be, so there is a small overflow of pans. So is that due to too much yeast or too much sugar, which is also 1 Tbsp. of sugar to a loaf of bread, or would the extra rise in air come from the mixture of flour and starch I use which is 3 1/4 C. white or Brown Rice Flour, 2 1/2 C. Sorghum Flour, 3 C. Cornstarch, 1 1/4 C. Potato Starch Flour mixture for 4 loaves of bread. Also used is 4 Tbsp. dry yeast, 4 Tbsp. sugar, 6 C. warm water, 8 tsp. Xanthan Gum, 4 tsp. salt, 8 eggs, 6 Tbsp. oil and 4 tsp. vinegar, which is mixed together in proper order.
Thank you! I LOVE your Yummy Sandwich Break Recipe and so does my GCFC 5 year old little guy. On a whim, I tried to see what would make it taste more sourdough-y and I think I’ve come up with a great and yummy solution.
I followed your recipe to a tee, except that I upped the flour mixture amount form 2 1/2 to 3 cups and then added 3 tsp of lemon juice and 1 cup of almond milk to the wet ingredients (I used Pacific Organic Low Fat Original Almond Milk). The result tastes a LOT like good ‘ol sourdough bread!
I baked it in my new breadmaker, a Cusinart, which interestingly enough has a Gluten Free baking mode. It turned out fantastic and I have sliced and frozen it so that we can enjoy it whenever. Thanks again for taking the time to share your terrific recipe. It’s a lifesaver!
I’m not having any luck making gluten free, egg free and dairy free bread at all! I have thrown out so much $. The bread either falls and/or is gummy. I’m very frustrated!!
What am I doing wrong?
I am a former bakery owner of traditional wheat baked goods that was asked to develop a class for gluten free baking. I have found a few differences concerning rising the loaf in the pan. Unlike traditional bread which you let rise above the rim of the pan, gluten free loaves do better if you let them rise to 1/2 inch below the rim. This will usually allow the loaf to dome like a traditional loaf. Best baking to you!
can i please have your recipe for gluten free soy free all purpose flour mix?thank you!
What is your favorite bread machine for GFCFSF? I am looking for one for the holidays. Thanks! Anne
In reply to your comment on the large 10″ pan compared to the 8″ pan, you are correct. A pan that is 8 x 4 inches will result in a higher loaf. Also, I use a spatula to taper each end of a loaf after I put the dough in the pan to rise. I also let it rise only to just about half an inch below the rim of the pan. These 2 steps cause the loaf to dome like a regular loaf of bread. Thanks Anne.
Thank you for posting and explaining this recipe. I’ve had to cook dairy free & soy free for several years. Now I have to be gluten free & it is really hard to find recipes that are dairy free, soy free & gluten free. So thanks for the help!
Does anyone know of the best substitute for eggs in bread? Thanks
Hello Kristen,
a good substitute for eggs is ener-G egg replacer. Use almond milk instead of water to get a good consistency without using dairy. Go to my site at http://www.fearlessbread.com and click the gluten free tab for som good recipes for focaccia, sandwich bread, and teff bread. Just use the replacer in place of eggs. Hope this helps.
thanks for sharing all of your experimentation notes, mary frances! I made this last night for the first time and it was so much easier than i thought it would be. i’d never made any yeast bread before, gf or not, so i was intimidated, but it was a breeze. and tastes wonderful!
i used all egg white (intolerant of yolk; also added an exta tsp of oil to replace the fat from the yolk), rice vinegar (intolerant of apple), and replaced the sugar with maple syrup.
i’m thinking of using white rice flour in place of the corn flour next time just to see if it turns out okay–the final product of this was quite reminiscent of cornbread (and i’m not such a big fan of that). does anyone have any experience with doing that or something similar?
For egg substitues, I always use 1/4 cup unsweetened applesauce. I’ve never had a problem with it. I’m gluten free, dairy free, egg free, and soy free as well!
I was just wondering if ya’ll could fix it to where you can print the recipe without all the blogs and advertising ads.
Thanks so much,
Jacque
I made this bread today. I accidentally bought rapid rise yeast, so I just whisked it into the dry ingredients like the package recommended and then add the two liquid mixtures (mixed in water/sugar/yeast mixture first…then added egg mixture).
I heated the oven as the recipe says and also boiled a pan of water and placed it on the lower oven rack. The bread rose beautifully.
Because of using a glass pan, I baked the bread at 350 F.
Made a sandwich with it, and it was good. I’m not used to texture of white bread, but I’ll adjust. Before my GF days, I ate Pepperidge Farms 15 grain bread. I’m just used to a heavier bread.
This is the GF flour mixture I used.
3 cups brown rice flour
1 cup potato starch
1/2 cup tapioca flour
1 1/4 tsp. xanthan gum
Would this recipe work with a millet and oat mixture? Would I need to add anything to these flours besides xanthan gum?
xanthan gum is soy I know you have try potato starch after it but if someone uses the recipe as it is and doesn’t know that this is just another name for for a soy product they could have an allergic reaction. Just wanted to share that thought this doesn’t need to be posted.
@ jody- if you search online for what xanthan gum is, it is actually a corn derived product, not a soy product..do your research before telling other people what it is.
Xanthum gum can come from soy, corn, or WHEAT so be careful and know where it comes from exactly. I have made many quick breads without xanthum gum or guar gum and my stuff rises 1 1/2 inches above the pan line and is TASTY. My recommendations of flours to use are
brown rice flour, white rice flour, millet, quinoa. You can mix and match with these flours or any other ones for that matter but these flours are very degestible and easy to work with and provide a base for cooking with gluten free. Also another starch I found that works WONDERFUL is arrowroot starch. Not only is it tasteless but it actually cleanses out your colon too! AND you dont need to add a zillion starches to make your bread rise you can just use arrowroot and your bread will be just fine. When I bake I add 1/4 cup of water per cup of flour for moisture and it seems to help the breads rise better. For banana muffins, or fruit muffins at least 1 cup of fruit or vegetable per 3/4 to 1cup of flour. You will still add 1/4 cup of water for needed moisture. The trick for rising for me is 3/4 to 1 cup of gluten free flour you would add 1/2 tsp of baking soda in the recipie.
This is a perfect base recipie for experimenting with what kind of bread you would like.
3/4 to 1 cup of gluten free flour
1/2 cup starch
1/2 tsp of baking soda
salt u desire
1/4 cup of oil
2 eggs
any other things u wish to add
1 cup of pureed whatever or fruit
1/4 cup of water
Also when you bake the quick breads bake them at 375 degrees F for about 20min. Touch the top of whatever youre baking and if it bounces back take it out. If your bread is overising add a little less in baking soda. Have Fun!!
Mary,
My son is a type 1 diabetic and I have just recently been diagnosed with Celiac Disease. Do you by any chance know the Carb ratios for your recipes or maybe how I could figure that out? I love the bread and waffles from your site. I’m going to try some of the other recipes this week.
Thanks in advance for your help!
Julie
I’m going to try this one. I live at 8500 feet so I’ve really had a time with over rising at first and then going flat. I think I’ll cut the yeast to 2 tsp. Any other suggestions would be helpful.
Well, I was not sure what setting to use on the bread maker but it seems I chose wisely. I found the closest to 80 minute bake time as I could and layered my ingredients as the bread maker tells you to. I figured the bread would rise as it baked and it did. I like the taste and the rice texture is not there with it’s over powering ‘grit’. If my husband eats the whole loaf in a week I will know this is the bread for him. a good recipe and good baking experience. Thanks for the insights.
My 6 year old daughter has just been dignosed being highly allergic to soy,peanut,walnut, and food dyes. She also has allergic reaction to clothing dye as well as she breaks out to other enviromental things as walking by the tires when we walk into Sam’s Club. We have quickly changed so many things and are still searching. I want to make eating still a joyful thing for her. She is already a healthy eater, thank goodness! But she likes bread and her Ranch dressing. Anyone have a good recipe for the Ranch dressing we would be so thankful! We are also having her tested for celiac disease next week which will explain a lot of her other problems! So glad I found your site. And by the way you have the cutest little boy!
Sincerely, Ann and Hannah Renner
I know you have your own all-purpose GF mix for this recipe, but will it work just as well with Bob’s Red Mill GF all-purpose flour? If so, are there any changes to the recipe I might need to make? I am so excited to try to make some good GF bread. I haven’t had bread since April! Also, does the type of bread pan make a difference in the way the bread comes out…..nonstick vs. glass vs. ceramic?
I just discovered your site today and am excited about what I have found!
Thank you!!!!
Romanita
I love this recipe! Thanks for posting it! I baked it yesterday and it turned outy great! 😀