Don’t be afraid of trying to cook your own great-tasting gluten-free bread! Gluten free bread seems so mysterious. I’ve talked to plenty of people that have been gluten free for years and are afraid to bake a loaf of bread. Don’t stop reading if you’re already a great gluten free baker. You’ll learn something in this post too! The #1 fear that keeps people from diving headlong into gluten free bread baking is the fear of the unknown.
Fear of the unknown usually pops up when someone contemplates baking bread for the first time. (Though it sometimes is sneaky and doesn’t surface until after their first failed loaf.) It’s typically expressed with comments such as “I’ve never made bread. I have no idea where to start.” or “I made a loaf and it turned out horribly. I’ve no idea what to do next.”
So, let’s demystify gluten free bread.
Gluten free bread contains 7 basic ingredients
- Flour: The largest ingredient in gluten free bread is flour, and in gluten free baking we use a mixture of different GF flours. The reason for this is that it takes a mixture of different flours to approximate a bread texture that is similar to wheat bread. There are so many gluten free flours to choose from, and a mixture of 3 or 4 should be sufficient. You can use grain flours (like rice or sorghum), starch flours (such as corn or tapioca), bean flours (like garfava or soy), and nut meals (like almond or pecan). There’s no one secret flour mix that makes the perfect loaf of gluten free bread. There is a secret though, and I’ll tell you what it is. The secret to making a good loaf of bread is to know the flour to liquid ratio for the flour mix that you are using. If you’re baking bread with wheat flour, it’s simple – the ratio is 5 parts flour to 3 parts water. But, with gluten free bread, the ratio depends on the flour mix that you are using. Some gluten free flours can absorb much more water than others. If you use super-absorbent flours (like masa harina and coconut meal) and don’t add enough liquid, then you’ll end up with a stiff dough that won’t rise. Likewise, if you use less absorbent flours (like almond flour) and add too much water, then the dough will be too thin and won’t have the structure that it needs to rise. Unfortunately, there’s not a handy chart to tell you what the flour to liquid ratio is for the different combinations of flour. But, you can tell when the flour to liquid ratio is right just by looking at your dough. (How do you learn what the dough is supposed to look like? Patience, grasshopper. We’ll talk about that later.)
- Liquid: Liquid is the next required ingredient in bread. Most recipes will use water or milk. Milk makes the bread more rich. Non-dairy milks are fine, but I generally just use water – unless it’s a special occasion bread, like my Pascha (Easter) bread.
- Yeast: Active Dry yeast or Rapid Rise yeast will both work. Rapid Rise is best for bread machine because it does rise more quickly. The amount of yeast that you use is not set in stone and depends on your altitude. If you use more yeast, the bread will rise more quickly. If you use less yeast, the bread will rise more slowly. A super-fast rise is not good though, and generally results in a loaf that falls in the oven. It is possible to make a great yeast-free gluten free loaf bread, but it does require special techniques to make a dough structure will work with baking soda or baking powder.
- Salt: Bread tastes bland without salt. If you find a gluten free bread recipe to be less than flavorful, increase the salt. It really is as simple as that.
- Binding agent: Binding agents are key to getting gluten free bread to work. Xanthan gum is probably the most common binding agent, but in the last few years more gluten free bakers have begun using guar gum, chia seed meal, flax seed meal (and other seeds). These binding agents give the dough the elasticity and strength that it needs to rise. The amount of binding agent that you need will depend on the recipe and the binding agent that you choose. Eggs are a common binding agent (and they add liquid and fat as well). Three large eggs seems to be the perfect amount for me. However, you can also use an egg replacement powder or other binding agents (like flax eggs)
- Fat: Bread does need a little fat, which is usually added in liquid form. Olive oil, vegetable oils, melted butter, or melted coconut oil will all work, so choose the one that’s the best fit for your diet.
- Sugar: Sugar helps the yeast to grow and makes the crust more brown. If sugar is a problem for you, you can leave it out or use honey or agave nectar. If you leave the sugar out completely, the bread will rise more slowly, but it will still rise.
So there you go
Flour, liquid, salt, fat, yeast, binding agents, and sugar. That’s not so hard, is it? You can do this!
Three Simple Steps to Gluten Free Bread
Remember the 7 ingredients that make up gluten free bread? Say ’em with me: flour, liquid, salt, fat, yeast, binding agents, and sugar.
In this article, I’m going to walk you through how these ingredients should be combined if you want to make delicious gluten free bread.
There are three steps to baking bread. Only three – see this is NOT scary! In the first step you make the dough, then you let the dough rise, and then finally you bake the bread.
Step 1 – Make the Dough
When you mix the dough, you should start by proofing the yeast. To proof the yeast, you gently stir the yeast and sugar into 1 cup (8 oz) warm water (make sure that it’s between 105 and 115 F) and then let it sit. After several minutes the mixture should become bubbly/foamy. This indicates that the yeast is doing its thing.
After your yeast is proofing, measure and mix the flours. I highly recommend using recipes that give the flour amounts by weight. Buy a digital scale and use it!
Add the other dry ingredients (usually salt and any dry binding agents) to the flour. In a separate bowl, mix the eggs, oil, and any remaining liquids together.
Finally, add the yeast/water mixture and the egg/oil mixture to the flour mixture. Mix it very well – at least 3 to 4 minutes with a mixer.
In case I lost you there, you mix up the bread in 3 bowls. The first bowls contains one cup of water, the sugar and yeast. The flours and other dry ingredients go in the second bowl. Eggs, oil and any remaining liquid ingredients go in the third.
Mix up each bowl separately, and then add the two bowls containing liquids to the bowl containing the flour. Now that everything is altogether mix it with a hand or stand mixer for a minimum of 3 to 4 minutes.
Step 2 – Let the Dough Rise
To get ready for the 2nd step (dough rising), grease a loaf pan with some sort of solid fat (butter, shortening and solid coconut oil all work) or line it with parchment paper.
Scoop the dough into the pan and set it in a warm place to rise. I like to set mine on the back of the stove with the oven turned on the lowest setting. Hot air from the oven vents near the back of the stove and creates a toasty place for the bread to rise.
The dough needs to rise until it is near or even with the top of the pan. Don’t let it get any higher than that. But if it does, stir the dough (which will cause it to fall) and let is rise to the top of the pan again. And pay attention this time =)
The length of time required for step 2 will vary each time you bake bread because the rising time depends on the temperature of your home.
Step 3 – Bake the Bread
The last step is to bake the bread. Be sure to preheat your oven to the temperature specified in the recipe. I like to put a baking stone in the oven when I preheat it.
Then I place the loaf pan on top of the baking stone and the baking stone helps maintain the even temperature that the bread needs. (Modern ovens can be somewhat frenetic with their temperature regulation).
Bake the bread until it reaches an internal temperature of 210 degrees. You’ll need a thermometer to determine this. You can buy one at most grocery stores for a relatively low price and it takes all the guesswork out of determining whether the bread is done.
After you take the bread out of the oven, remove the bread from a pan and let it sit on a cooling rack for at least 15 minutes before cutting. If you don’t, you’ll squoosh the bread when you cut it.
That’s it! That’s gluten free bread baking in a nutshell. You can totally do this!
Your assignment:
If you’ve never baked a loaf of gluten free bread, then I want you to start this week. I’ll be sending you a couple of recipes in a few days and I want you to bake one of them (or any other gluten free bread recipe that you’ve had your eye on).
The challenge for those of you who are already successfully baking gluten free bread is a little bit more difficult. Since you already know what your bread dough should look like, I want you to make your usual gluten free bread recipe, but using a different flour mix. You can make up a flour mix, or buy a packaged one. But, use the new flour mix and then add the liquid in the recipe gradually so that you can stop when you’ve added enough. Weigh the flours and liquid if you can, and see what the flour : liquid ratio is.
If you have the time, go back and bake your usual gluten free bread too and weigh the flours and liquid for that as well. Now you have two flour:liquid ratio measurements. Give some thought to what those two measurements can tell you about the flours that you’re using.
Making Gluten Free Bread Easy and Convenient
The key to staying gluten free is to make being gluten free as easy and tasty as possible. One of my tricks is to keep a stash of gluten free bread mix in the freezer. It only takes 2 minutes to grab a bag of flour, mix in the liquid ingredients (handily noted on the bag), and pop the dough into the bread machine.
Even better, my husband can do it too, so bread making is not “my†responsibility. (This only works if he remembers that you showed him the new stash of bread mix in the freezer!)
I’ve talked a lot about the pros and cons of storebought mixes. If you need the convenience of a mix, but for whatever reason cannot or do not want to use a storebought mix, then this is a great way to make gluten free bread completely from scratch as quickly as you can make a storebought mix.
Just set aside a few hours one day to prep the mixes, and then you’ll be set for several weeks.
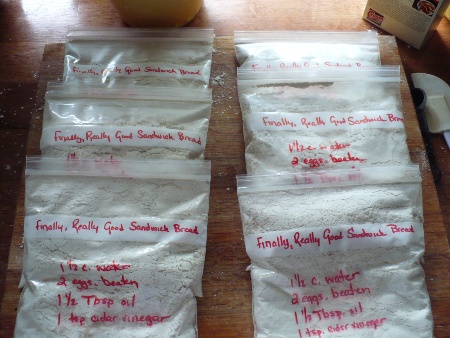
And, if you’re thinking that it would be easier to pick up a bag of bread mix at the store, you’re probably right. But it wouldn’t taste nearly as good, and that’s more important than being easy.
If you’d like to make your own stash, grab your favorite gluten free bread recipe and follow along.
How to Make Homemade Bread Mix
First, mix up a large batch of the main flours in your gluten free bread recipe. In this picture I’m making my Gluten Free All Purpose Flour because that’s the main ingredient in my favorite gluten free bread recipe. The recipe calls for 2.5 cups of flour (or 12 oz), so I need to mix up 20 cups of flour mix (or 96 oz) in order to make 8 bags of bread mix.
It takes a little bit of math to figure out how much of each flour to use. The ratio of flours in my bread mix is 3:3:2:1, so 9 parts in total. If I make 1 part = 5 oz, then the entire batch of flour will weigh 45 oz. Obviously, that’s not enough.
Since 90 oz. of flour would not be quite enough either, I’ll set 1 part to = 11 oz. Now, I can easily see that I’ll need 33 oz of flour #1, 33 oz, of flour #2, 22 oz of flour #3, and 11 oz of flour #4.
You can determine the ratio, by cup or weight, of any flour mix if you have the recipe for it. Then just use the mathematical exercise above to figure out how much of each flour you need to make a big batch.
The math is much easier if you use weight measurements, and when you’re working with this much flour it’s just easier to weigh the flour than to try to remember how many cups of flour you’re already measured out. I always lose count around the 5th cup!
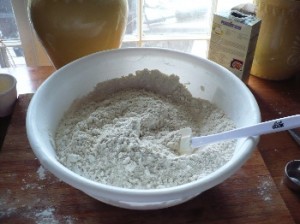
Now, measure enough flour for one loaf of bread into each plastic freezer bag. I used a quart size bag. My gluten free recipe calls for two and a half cups (12 oz) of my All Purpose Flour Mix, so I just measure that amount of flour into each bag.
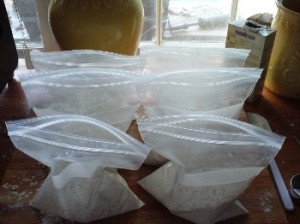
Next, take each additional dry ingredient and add it to each bag. For example, I add 1 Tbsp of yeast to each bag, and then 2 tsp. of xanthan gum to each bag, and then the sugar, and then etc.
It’s very important to pay close attention during this step because it’s really hard to tell the difference between 1 tsp. of xanthan gum in a bag and 2 tsp. of xanthan gum in a bag. (No need to ask how I know this!)
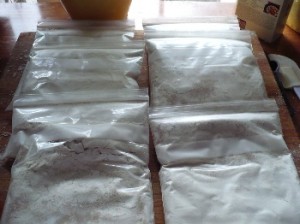
Now you can close each bag, lay it flat, squeeze all of the air out and seal. The reason that you need to get most of the air out is that it makes it much easier to write the recipe on the bag. The bread mix will be in the freezer and should stay fresh for at least 6 months.
Using a Sharpie, write the name of the recipe and the amounts for the wet ingredients on the bag. I love this part! If you do this, you won’t have to find your recipe when it’s time to make bread. Just add the ingredients that are listed on the bag! You can also write any additional directions, if you (or any other bakers) will need them.
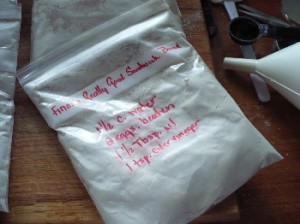
Stack the bags in the freezer and forget about them till you need them. Be sure to tell everyone of baking age in your family about your stash, so that they can bake you bread in your time of need. (This is particularly handy if you’ve just had a baby or an illness in the family.)
When you’re ready to bake a loaf of breaduse this homemade bread mix just like you would a store-bought mix. Add the liquid ingredients, mix the dough, let the dough rise, and then bake it.
Or, just add follow your bread machine’s instructions as to the order in which dry and wet ingredients should be added, set the machine and enjoy your gluten free bread a couple of hours later.
It’s Time To Bake Some Gluten Free Bread!
Today’s the day you’ve been waiting for. It’s time to bake a loaf of gluten free bread!
If your brain started making excuses after you read that last sentence, write down all of the reasons that your brain is saying you shouldn’t bake a loaf of bread yet.
If you don’t have all of the equipment that you need, then make a plan to get that equipment. If you don’t have all of the ingredients that you need, put them on your shopping list.
Once you’ve taken care of all of the reasons that are not fear related, burn the list. Fear is not a good reason for not baking bread!
Read through the recipe below, make any alterations that you have too for other food allergies/intolerances, and then bake a loaf of bread.
Even if this loaf doesn’t turn out perfectly, you’re going to learn a lot from this loaf of bread. What you learn will vary by person, but I promise that you’ll learn something if you are mindful throughout the process.
Watch the dough carefully throughout the entire process. Take notes about what you observe; detail is good. These notes will be invaluable as you learn about baking bread and experiment with different bread recipes.
Okay, enough talking! Time to get started.
Finally, Really Good Gluten Free Sandwich Bread
- 1 Tbsp. bread machine yeast
- 1 Tbsp. sugar
- 1 ½ c. water (105 degrees or a little less than hot)
- 2 ½ cups of my gluten free flour mix
- 1 Tbsp. xanthan gum
- 1 tsp. salt
- 3 eggs (or 9 Tbsp. water and 3 Tbsp. ground flax seed)
- 1 ½ Tbsp. oil
- 1 tsp. cider vinegar
Instructions
- Start by combining the yeast and sugar in a small bowl (I use the smallest in my set of three nested mixing bowls). Add the water while gently stirring the yeast and sugar. Let this mixture sit while you mix the rest of the ingredients – bubbles and foam should form if the yeast is happy.
- Combine the flour mix, xanthan gum and salt in the largest mixing bowl and stir well.
- In a third bowl, whisk the eggs, oil and vinegar until the eggs are a bit frothy.
- By this point the yeast mixture should be foamy, so you can pour the two liquid mixtures into the flour mixture. Blend the dough with a mixer for 4 minutes.
Bread Machine Directions
Scoop your dough into the bread machine and smooth the top of the dough. I bake my bread using an 80 minute setting that allows for 20 minutes of kneading, 18 minutes of rise, and 42 minutes of baking. However, since I don’t use the paddle in by bread machine, I’m effectively doing a 38 minute rise and a 42 minute bake.
Conventional Oven Directions
Scoop the dough into a greased loaf pan. Allow the dough to rise in a warm area until is is almost to the top of the pan. Then bake at 375 degrees for 50 – 60 minutes, or until is reaches an internal temperature of 210 degrees F.
Other Bread Tips
- The masa harina in the flour mix for this recipe is usually available in the Hispanic sections of most grocery stores. Due to the way it is processed, masa harina is very absorbent and you cannot substitute corn meal or corn flour. You can purchase masa harina on Amazon.com if it is not available locally.
- If you are allergic to soy, then you can substitute any of the following flours for the soy flour in the flour mix: sorghum flour, garfava flour, or quinoa flour.
- If you are allergic to eggs, use the flax substitute listed in the recipe, or follow the instructions on your favorite egg replacement powder. When I use the flax eggs, the bread is usually slightly wetter than otherwise.